...
To perform a push, you first need to create a "Push Preset" from the Mass Config Push home page. For the "Commands", you can provide the same sequence of commands and key-strokes to Unimus as you would when interacting with the device CLI manually.
After a preset is created, you can click "Run now" to push the provided commands to the selected devices.
...
For details on exactly how commands are sent to devices, please see How commands are sent to devices.
...
Macros
Since version 2.0.3, Unimus supports command submission modifiers and sending control sequences.
There are 2 command submission modifiers possible:
| Code Block |
|---|
$[enter]
$[no-enter] |
These modifiers have to be put at the end of the line, and control if <Enter> will be sent after the command line.
The default behavior is to send <Enter> after each command line, UNLESS "$[no-enter]" is specified, or the command is a control sequence.
(please check the Command parsing examples section for more details)
Unimus supports sending various control sequences to the device, in this format:
...
Release 2.4.0 introduced overhaul of how modifiers work.
To customize Mass Config Push Presets Unimus supports using of Macros. These are Modifiers, Actions and User variables.
Modifiers
Modifiers are two-word macros used to adjust the interaction behavior with the remote device. Normally, Unimus waits for some known output (for example a prompt) after each sent command line (see How commands are sent to devices for more info).
Since version 2.4.0 modifiers are used in the following way:
- allowed modifiers: wait-echo, wait-reply, enter, fail-on-error
- format: $(modifier_name yes/no)
- must always be at the end of a line
- multiple consecutive modifiers are allowed
- a single modifier can only be declared once
- are followed by <Enter> unless "$(enter no)" is used
Modifier submission alternatives example:
| Code Block |
|---|
$(wait-reply yes)
$(wait-reply no) |
Specifying "$(wait-reply no)" will cause Unimus to instantly continue sending the next command line without waiting for any device outputs.
This can be useful when for example the device doesn't respond with any data after sending some command/line, and you want Unimus to continue sending data to the device.
(please check the Command parsing examples section for more details)
Actions
Actions are two-word macros used to send control sequences and delays for interactions requiring pauses during execution.
Since version 2.4.0 actions are used in the following way:
- allowed actions: send, delay
- format: $(action_name value)
- send inputs a control sequence (it is not followed by <Enter> unless "$(enter yes)" is used)
- delay simply waits for a specified time (in ms)
- can be placed at any position in a line
Action submission example:
| Code Block | ||
|---|---|---|
| ||
$(send 0x03)
$(delay 100) |
As mentioned above, <Enter> is not by default sent after a control sequence by default, but this can be forced by appending "$[enter]" to the end of the line.
Full list of command sequences available in this article: VT100 Control / Command sequences.
(please check the Command parsing examples section for more details)
Both submission modifiers and command sequences support escaping by prefixing them with an additional "\":
| Code Block | ||
|---|---|---|
| ||
\$[0x01] (send 0x03) = "$[0x01](send 0x03)" will be sent literally to the device(s), instead of a control sequence \$[(enter] yes) = "$[(enter] yes)" will be sent literally to the device(s), instead of modifying command submission behavior |
Please check the Command parsing examples section for more details on how modifiers and control sequences work.
...
The main (and most important) portion of Config Push is sending the actual commands provided in the "Commands" set to the devices.
Unimus here works as following:
- from the command set, send the next command line to the device, followed by Enter
- collect all output, up until a known (recognizable) output occurs
- IF device asks if it should continue with output (more info below), Unimus answers "Y", GO TO step 2
- IF device outputs a question (such as a "[y/n]" question - more info below), stop, GO TO step 1.
- IF device asks for a password, or another "secret", stop, GO TO step 1
- IF device pages through output ("-- more --"), Unimus sends pagination key (space for most device types) to proceed to next page, GO TO step 2
- IF device asks to confirm end of output, ("press Q to finish"), Unimus sends the appropriate key to finish output, GO TO step 2
- IF a prompt is received, stop, GO TO step 1
As per the description above, pagination ("-- more --"), and output termination which some devices require ("Output finished, press Q to continue") will be handled completely automatically by Unimus.
For step 3, Unimus To make this simple - you can provide the same sequence of commands and key-strokes to Unimus as you would when interacting with the device CLI, and Unimus will properly interact with the device as expected. To understand more in depth how Unimus interacts with a device, here is a (still very simplified) chart:
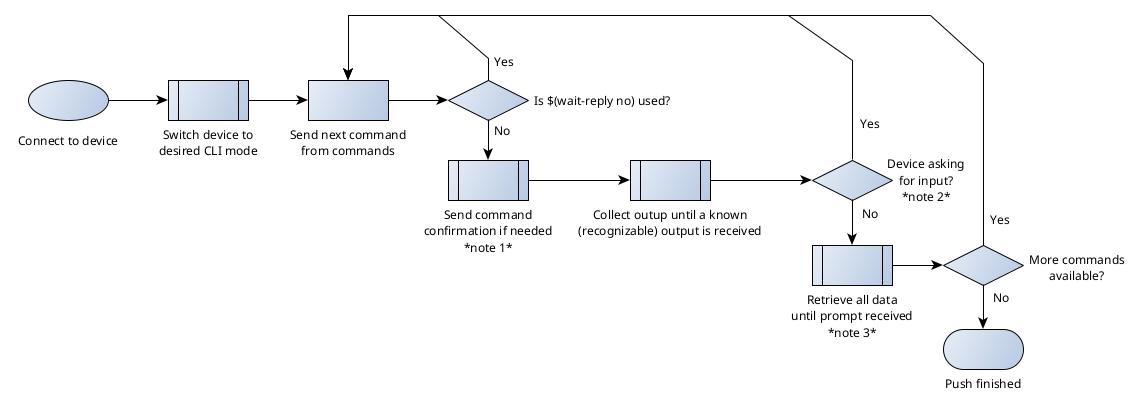
Note 1:
Unimus will automatically answer "Y" to questions like "Show all items?" or "Do you want to show sensitive items?" or "Confirm command...", etc.
For step 4, Note 2:
Unimus recognizes any generic questions asked by devices that end in the "[y/n]" or "(yes/no)" prompts, but also things like "Press enter to confirm change", etc.
For step 5, usual Password prompts like "Password: " or "Password for..." and similar password prompt are also properly recognized To make this simple - you can provide the same sequence of commands and key-strokes to Unimus as you would when interacting with the device CLI, and Unimus will properly interact with the device as expectedand will advance to sending the next line from the "Commands"
Note 3:
If the device pages through output ("-- more --"), Unimus sends pagination key (space for most device types) to proceed to next page automatically.
IF device asks to confirm end of output ("press Q to finish"), Unimus sends the appropriate key to finish output automatically.
Command parsing examples
Push commands:
...
| Code Block | ||
|---|---|---|
| ||
commit $[(send 0x1A]) y$[no-enter](enter no) |
Device output (keys sent by Unimus in green):
| Panel |
|---|
device# commit<enter> |
Sometimes, you want Unimus to send commands to the device even if the device doesn't output any known outputs after sending a command line.
For example, many devices don't respond with anything if you need to provide a text block. You can avoid "INTERACTION_ERROR" in this case like this:
| Code Block | ||
|---|---|---|
| ||
banner motd ^$(wait-reply no)
This is the start of the banner$(wait-reply no)
And this is a 2nd line of the banner$(wait-reply no)
This is the end of the banner^ |
It is important to NOT specify "$(wait-reply no)" after the last line, since the device will respond with a prompt after the last line, and you want Unimus to wait for the prompt and collect the output.
The interaction with the device will look like this:
| Panel |
|---|
device (config)# banner motd ^<enter> |
Debugging failed pushes - "INTERACTION_ERROR" group
...